Self-Registration Pilot Program
We are excited to announce the release of more self-serve options to our students!
In Winter 2025, students in General Arts and Sciences programs, ONLINE Communicative Disorders Assistant, ONLINE Early Childhood Education, ONLINE Police Foundations and ONLINE Addictions and Mental Health began to register themselves through the student portal for most of their course related activity.
The system will be live at 9:00am on Wednesday, April 9th and an extensive communication, training and support plan is underway to ensure an optimal student experience.
The shopping cart functionality will allow students to add courses to their shopping cart before their enrolment timeframe. This means students will have the opportunity to validate their courses in advance to ensure they meet the eligibility requirements for course enrollment, well before the enrolment timeframe begins. The shopping cart functionality will open at 9:00am on Wednesday, April 9th. To learn how to add a course to your shopping cart, see the how-to section at the end of this page.
Impacted students have been contacted.
Important Details
- If your program level requires you to take a General Education Elective Course (GENE), please feel free to register through this self-service portal. You may have already received communications and surveys regarding the GENE registration process, you may proceed with the self-registration process.
- For ONLINE students: Due to system limitations at this time, you may notice some in-person course options. Please do not register in any in-person courses, enroll only in online courses. Online courses are identified as those that have TBA meeting dates and times (General Arts and Sciences programs will be registering in in-person courses).
- The level you enroll in should correspond to the semester you are enrolling in. For example, all new students should be choosing level 1, as they are enrolling in semester 1.
How-To
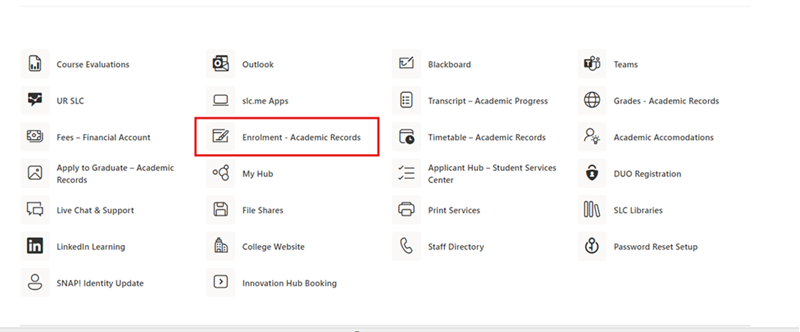
- Go to SLC.me and log in with your student email address (Click HERE for more information on SLC.me).
- Scroll past the important messages.
- Click on the “Enrolment (Academic Records)” button.
- Once you get into the homepage, you will want to be in the “Manage Classes” menu, NOT the “Academic Records” menu.

To enroll in a class, you must first add it to your shopping cart. This step allows you to “validate” the class, ensuring you are eligible for enrollment. Your shopping cart appointment is the time frame during which you can add classes to your cart. Once this is done and your class is validated, you can enroll. Your enrollment appointment is the time frame during which you can enroll into your class.
To check when your appointment time-frames are, follow the steps below:
- Go to the “Manage Classes” menu.
- Click on the “Enrollment Appointment” tab on the left menu.
- You will see both your enrollment and shopping cart appointment time-frames listed.
Watch the video tutorial below:
Before you can enroll, you must validate a class to ensure you are eligible for enrollment. You can validate a class by adding it to your shopping cart during your appointment time frame.
To add a class to your shopping cart and validate a class, follow the steps below:
Add to your shopping cart:
- Go to the “Manage Classes” menu.
- Click on the “Enroll by my Requirements” tab if you aren’t already there.
- Choose the level you would like to satisfy.
- Choose the class you want to enroll in.
- Click on the “View Classes” button at the top right of the page.
- Select the class.
- Review your selection, click “Next” at the top right of the page.
- Click “Add to Shopping Cart” and then click “Next” at the top right of the page.
- Review and click “Submit”.
Validate the class:
- In the “Manage Classes” menu, click on the “Shopping Cart” tab on the left menu.
- Select the class you wish to validate.
- Click the “validate” button at the top right of the page.
- A confirmation message will appear saying if you are eligible or ineligible for the class. If this message does not appear, make sure you are in your shopping cart time frame period.
Watch the video tutorial below:
Once your class is validated, you can now enroll into the class. Again, you can only enroll into a class during your enrollment appointment time frame.
To enroll in a class, follow the steps below:
- Click on the “Shopping Cart” tab on the left menu.
- Select the class.
- Click the “Enroll” button on the top right of the page.
- To see your schedule, click on the “View my Class/Schedule” tab on the left menu, and then click the “By Class” option at the top of the page.
Watch the video tutorial below:
To drop a class, follow the steps below:
- Click on the “Drop Classes” tab on the left menu.
- Select the class you would like to drop.
- Click the “Next” button on the top right of the page.
- Click the “Drop Class” button on the top right of the page.
- Click “Yes” to confirm.
Watch the video tutorial here:
Check back here regularly for more self-registration news, updates and how-to materials.